Pre File Syntax
The most basic elements of the USim simulation process, which are discussed in USimComposer Introduction and considered prerequisites for this section, are creating, running, and visualizing a run space. Here we will examine the basic concepts within a USim input file, which contains more detailed information than the Key Input Parameters view in the USimComposer Setup tab, and is by default not exposed to the user.
This section discusses the syntax used in pre files.
A pre file consists of:
- Comments
- Variables
- Top-level simulation parameters
- Parameters and vectors of parameters organized into input blocks
- Macros
Accessing the Input File
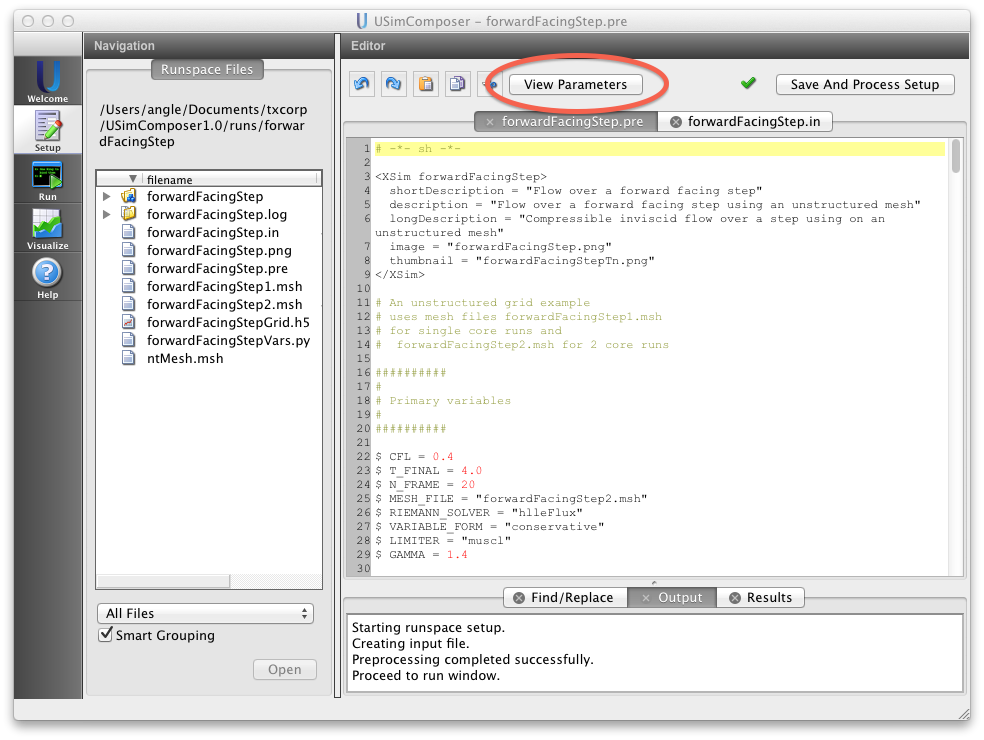
To access the input file in a run space, navigate to the Setup tab and click the View Input File button, which is circled in red in the below figure.

Figure 14: Click the View Input File Button to change from the Parameters View to the Input File Editor.
This opens the Input File view as shown in the below:
Note that you can return to the Parameters view by clicking the Parameters View button, which is circled in red in the above figure.
The remainder of this section describes the basic elements of a USim input file. For a more detailed description of USim input files, see Basic USim Simulations.
Symbol Definition
In USim, symbols are defined by assignment, similar to many other programming languages. For example, to define a given symbol with an expression, the syntax is:
$SYMBOL = EXP
where SYMBOL is the name of the symbol and EXP is any
valid expression.
The expression EXP is a valid expression. See
Expression Evaluation for details.
The preprocessor will not try to substitute a symbol on the left hand side
of an equal sign =. For example, the following code snippet:
$echarge = 1.6e-19
charge = echarge
results in:
charge = 1.6e-19
Comments
You can enter comments in either of two ways:
- Following a pound sign (#) either on a new line or a continuation of a current line
- Between the opening and closing comment tags <Comment> </Comment>
Note
Tech-X recommends that you always update your comments when you make changes to a pre file. The reasoning behind a change may become unclear if you do not provide comments that explain why you made the change. Pre files with old, out-of-date comments are difficult to work with.
Variables
Each line defining a variable begins with a dollar sign ($).
Parameters
Parameters can be integers, floating-point numbers, or text strings.
The format of the parameter value determines the type of parameter. For example:
- x = 10 indicates an integer
- x = 10.0 indicates a floating-point number
- x = ten indicates a text string
Some parameters accept any text string (within reason). Other parameters accept only a choice of text strings.
If USim can parse a value, such as 42, as an integer, it will do so.
If USim cannot parse the value as an integer, it will attempt to parse
it as a floating-point number – for example, any of the following:
42.
3.14159
1.60217646e-19
If USim cannot parse the value as either an integer or a floating-point number, it will parse the value as a string of text, for example, either of the following:
4o. (4 and lowercase O) or
4O (4 and uppercase O).
Given these rules, use a decimal point to specify a floating point number. Any number without of decimal point will otherwise be interpreted as an integer.
If a parameter is specified twice, USim will use the second occurrence of the parameter in the input file produced from the pre file. The style recommendations in this user guide will help avoid multiple specifications of parameters.
Vectors of Parameters
Vectors of parameters are enclosed by brackets [ ] with white space
used as separators. For example:
x = [10 10 10]indicates a vector of integersx = [10. 10. 10.]indicates a vector of floats
Input Blocks
Input blocks are used to create simulation objects. The block is enclosed by opening and closing tags such as:
<Grid globalGrid>
  .
  .
  .
</Grid>
The tag determines:
- object type:
indicated by an initial capital letter, for example,
Grid
- object name:
indicated by an initial lowercase letter, for example,
globalGrid
You use the object name to refer to the object in other input blocks. For example, in the input block for a particle object, you may refer to the name of the electromagnetic field object.
Input blocks can be nested. For example, input blocks for boundary conditions are nested within the input block for an electromagnetic field.
Macros
Macros simplify input file construction through providing a mechanism for encapsulating commonly used input file snippets. A user can then put into the input file only the macro, and then it will be expanded into the full input file at the time of pre-processing the prefile.
Macros can have multiple uses including importing a group of parameters from a separate file, or simplifying an input block such as follows:
<macro  myFluid>

 equations = [euler]

 <Equation euler>
   kind = eulerEqn
   gasGamma = GAMMA
 </Equation>
</macro>
You could then call your myFluid macro within the input file like this:
<Updater hyper>
 kind = classicMuscl1d
 onGrid = domain
 ...

 myFluid

</Updater>
For more information about macros, see Overview
Scoping and Evaluation
Symbols in USim are scoped. This means that the effect of a symbol’s definition is confined to the macro or block in which that symbol is defined. Whenever USim enters a macro or a new input file block, it enters a new scope.
In the case in which SYMBOL is defined in multiple scopes, USim
ignores the previously defined SYMBOL for the duration of the current
scope. In the case in which SYMBOL is defined more than once in the
current scope, the new value overrides the previous value defined in the
current scope.
This scope is closed once USim leaves the block or macro. That is, the symbol’s definition no longer has an effect once USim has used the symbol’s value in the macro or block where it was defined and then proceeded to a different block or macro. Scoping allows the next block or macro to be free to redefine the value of the symbol for its own purposes.
Global Variables
It is possible to declare a global variable in USim. This is done by first defining the variable, then declaring it global. For example:
<Block>
  $ X = 4
  $ global X
</Block>
Will cause the variable X to be equal to 4 outside of the Block. It is important to note that the variable must be defined, and declared global on seperate lines. For example $ global X = 4 will not define X as a global variable with value 4.
Expression Evaluation
USim evaluates expressions by interpreting them as Python expressions. Python expressions are composed of tokens. A token is a single element of an expression, such as a constant, identifier, or operation. The preprocessor breaks the expression string into individual tokens then performs recursive substitution on each token. Once a token is no longer found to be substitutable, the preprocessor tries to evaluate it as a Python expression. The result of this evaluation will then be used as the value of this token. All the token values are then concatenated and again evaluated as a Python expression. This result will then be assigned to the symbol.
Tokenizing, the act of breaking a string into tokens, is performed following the lexical rules of Python. This means that white spaces are used to delimit tokens, but are otherwise entirely ignored.
Note
A string within matched quotes is treated as a single token with the matching quotes removed.
The input files generated by USim are sensitive to white spaces; as a
result, USim has to re-introduce white spaces in the translation
process. By default, tokens are joined without any white spaces.
However, if both tokens are of type string, then a white space is
introduced. Also, tokens inside an array (delineated by [ and
]) are delimited by a white space.
See the Python documentation on the official Python website at http://www.python.org for more information about Python expressions.
Python Token Evaluator (txpp.py)
The Python preprocessor has the following features:
- It accepts a file, conventionally with suffix
.pre, for processing.- Lines in that file that start with the character
$are processed by the preprocessor.- Those lines are sent through the python interpreter to for evaluation
- The resulting values are replaced and written to a new file with suffix,
.in
For example, suppose one has an input file, myfile.pre, containing,
$ LIGHTSPEED = 2.9979e8
$ LX = 1.e-6
$ NX = 20
$ DX = LX/NX
$ DT = DX/LIGHTSPEED
<Grid thegrid>
    numCells = [NX]
    lengths = [LX]
</Grid>
dt = DT
Pressing the Save and Validate button in USimComposer’s Setup tab, or equivalently command line execution of:
<txpp.py directory>/txpp.py --prefile=myfile.prei
produces a file, myfile.in that contains:
#$ LIGHTSPEED = 2.9979e8
# -->   LIGHTSPEED      =       299790000.0
#$ LX = 1.e-6
# -->   LX      =       9.9999999999999995e-07
#$ NX = 20
# -->   NX      =       20
#$ DX = LX/NX
# -->   DX      =       4.9999999999999998e-08
#$ DT = DX/LIGHTSPEED
# -->   DT      =       1.6678341505720671e-16

<Grid thegrid>
  numCells=[20]
  lengths=[9.9999999999999995e-07]
</Grid>

dt=1.6678341505720671e-16
This mechanism facilitates modifying files to change systems size, resolution, or other parameters while keeping requisite mathematical relationships intact.
The preprocessor imports math, so one can include statements such as:
$ PI = math.pi
and then use the variable PI in the pre file. In addition, the replace
occurs for commented lines as well, so the myfile.pre could have
contained the line,
# dx = DX
and then myfile.in would have contained the line:
# dx = 4.9999999999999998e-08
This is useful for printing out intermediate values for, e.g., debugging.
The pre file can be made self executing by adding the stanza:
#!/bin/sh
$NTUTILSDIR/txpp.py --prefile=$0 $*
exit $?
to the top, where NTUTILSDIR is an environment variable that
gives the directory of the preprocessor. The preprocessor then knows to skip
lines up to exit before processing the file. In addition, the value of
any variable named NDIM defined in the pre file can be modified
on the command line with the directive -ndim = 2, for example,
to have all occurrences of NDIM in the file replace by 2 instead
of the value defined in the file. This enables writing only a single pre
file for simulations of multiple dimensionalities when the differences
in the file follow from the value of NDIM alone.
If a file fails to validate a brief explanation of what is wrong will be displayed in the Output tab under the Editor window. Common reasons for a file to fail to invalidate include
- Using features not available to your USim module. i.e. an example under the USimHS templates will not validate if you are using a USimHEDP license.
- A variable being declared as an integer instead of a float or vice versa. i.e. $ VAR = 6 instead of $ VAR = 6.0
- A macro being called without it’s parent first being imported.
- A macro has been called with the wrong number of parameters.
Now that we have examined USim pre file syntax, we are ready to discuss the creation of key parameters in the Setup tab of USimComposer in Key Parameters.